We may earn a commission when you click on the affiliate links in this post.
These buttery soft Italian Easter Cookies are perfect for Easter, tea parties, or anytime you want a sweet treat! Decorate them with colorful icing and festive sprinkles for a beautiful and delicious Easter dessert.

What Are Easter Italian Cookies?
When I visited Italy, I fell in love with the endless variety of cookies and pastries—each one more delicious than the last! Ever since, I’ve enjoyed baking Italian cookies at home, experimenting with different flavors and styles. These Italian Easter Cookies are a classic favorite with a festive springtime twist. They’re soft, buttery, and topped with pastel icing and delicate sprinkles, making them look just like little Easter eggs. Whether you’re adding them to an Easter basket, serving them after Easter dinner, or gifting them to loved ones, these sweet and colorful treats are sure to bring joy with every bite!

Ingredients for Italian Easter Cookies
Cookies:
The ingredients for these cookies are much like any popular cookie recipe. You can find the exact amounts of these in the recipe card at the bottom of this post but here’s what you’ll need:
- Butter – softened at room temperature
- Sugar
- Eggs
- Vanilla extract, almond extract
- Flour
- Baking Powder
- Salt
Frosting:
- Powdered sugar
- Vanilla extract, almond extract
- Gel food coloring – pastel colors. Use the good quality gels you can find at the craft store. The color will be better and they won’t thin out your frosting.
- Milk – or for a thicker frosting you can use heavy cream
- Nonpareils or sprinkles – for garnish

How to Make Italian Easter Cookies Step-By-Step
- Cream – Cream butter and sugar together until light and fluffy, this should take 3-4 minutes.
- Combine – Add eggs, and vanilla and almond extract. Mix with a wooden spoon until well combined. In a separate bowl, sift in flour, baking soda, and salt. Add the flour mixture to the butter and egg mixture and mix until combined.
- Chill – Use a cookie scoop to scoop and drop cookies onto a parchment paper lined sheet pa about 1-2 inches apart. Chill for at least an hour, or overnight. If you chill overnight, wrap the baking sheet in plastic wrap so the cookie dough doesn’t dry out.
- Bake – Bake for 10-12 minutes at 350-degrees F, or until the cookies are cooked through and the bottoms are lightly browned.
- Cool – These cookies need to be completely cool before frosting, or the frosting will run off.
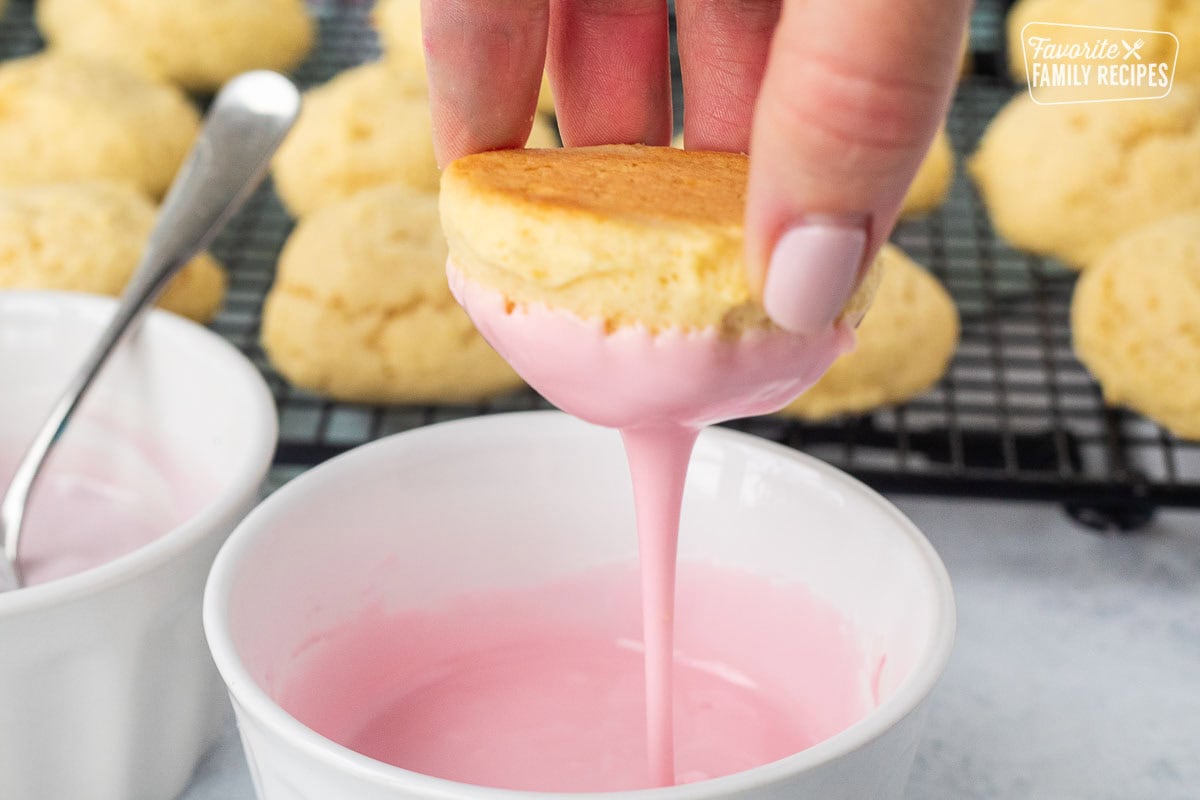
- Make icing – Whisk together powdered sugar, milk, vanilla, and almond extract until smooth.
- Frost – You can either dip the tops of the cookies in the frosting, or spoon the frosting over the top. Top with sprinkles.
Pro Tips for Making Italian Cookies
- Chill the dough for easier shaping.
- Use parchment paper or a baking mat to avoid sticking.
- Be careful not to over bake – the cookies don’t really change color from raw dough to cooked cookie so it’s easy to over bake them.
- Let cookies cool completely before icing.
- Allow the frosting to completely set before storing the cookies to avoid smudging. This can take about can hour.

Fun Variations and Additions
Flavor Ideas: Add about 2 tablespoons of lemon zest or orange zest for a tasty spin on this classic cookie. The citrus flavor is very Spring!
Shapes: Although this cookie typically is made in a circular or egg shape, you can also shape the dough into knots or braids for a fun twist!
Dyeing the Dough: Dye your dough in different pastel colors with gel food coloring for a fun, festive change. This is especially fun if you plan on braiding or knotting your dough as you can weave together different colors.

Frequently Asked Questions About Italian Easter Cookies
Yes! To store in the refrigerator: make your dough as you usually would, form into a disc shape and wrap in plastic wrap. Your dough will be fine in the fridge for 2-3 days.
To store in the freezer: prepare your dough, form into a disc, wrap in plastic wrap and then place in a freezer bag. This will last in your freezer for up to 3 months. When you want to bake the cookies, allow the frozen dough to thaw overnight in the refrigerator.
You can freeze cooked Italian Easter Cookies in an airtight container for up to 3 months. For best results, I would recommend not frosting the cookies until you are ready to enjoy them because when the frosting goes in the freezer, it tends to crack and fall off.
These cookies take about 10-12 minutes. Start by checking the bottoms of the cookies to see if they are golden brown. Gently lift and inspect. If the bottoms are golden brown, the cookies are ready! Place a layer of parchment paper on your baking sheet to keep the cookies from burning.
It takes about 15 minutes after glazing before the icing sets, but about an hour before the icing is fully hardened.

More Fun Easter Cookies and Desserts
Easter Bread
Easter Cupcakes
Homemade Peanut Butter Easter Eggs
Panoramic Easter Eggs
Bunny Cake
No Bake Chocolate Bird Nests

Italian Easter Cookies
Equipment
- stand mixer or electric mixer
Ingredients
- 1/2 cup butter (softened)
- ½ cup sugar
- 3 large eggs (lightly beaten)
- 2 teaspoons vanilla extract
- 1/2 teaspoon almond extract
- 2 cups flour
- 2 teaspoons baking powder
- ⅛ teaspoon salt
For the Frosting
- 3 cups powdered sugar
- 1 1/2 teaspoons vanilla extract
- 1/4 teaspoon almond extract
- gel food coloring (pastel colors)
- 2-4 tablespoons milk
- nonpareils or spinkles (for garnish)
Instructions
- Preheat oven to 350 degrees FCream together butter and sugars until smooth and fluffy. This can take up to 3-4 minutes.

- Add eggs, vanilla extract and almond extract and mix with a wooden spoon until well combined.

- In a separate bowl, sift flour, baking soda, and salt together. Add flour mixture to the butter mixture and mix until combined. Check the consistency here, it's ok for it to be sticky but it should hold its shape when scooped. This can vary with elevation and humidity. If needed, add a little flour a tablespoon at a time until it reaches more of a soft dough consistency.

- Using a cookie scoop, drop dough onto a parchment-lined baking sheet so the cookies are 1-2 inches apart. Chill for at least an hour or even overnight. If chilling overnight, cover with plastic wrap so the cookies don't dry out.

- Bake cookies in the preheated oven for 10-12 minutes or until cooked through and the bottom of the cookies are lightly browned.Cool cookies completely (you don't want them warm at all).

- Whisk together powdered sugar, 1 tablespoon milk, vanilla extract, and almond extract. Add milk ½ tablespoon at a time until you reach your desired consistency. You want the icing to be quite thick so don't thin it much if you an help it. Separate into separate bowls (however many colors you want to do) and add food coloring a little bit at a time until you get the color you like. Be careful with this, it is easier to add color than to take it away.

- Dip the tops of the cookies into the icing or spoon the icing over the top.
- Add nonpareils or sprinkles over the tops before the icing dries onto the cookies.

What size cookie scoop do you use as they come in a variety of sizes. Thank you
It’s a medium size or 1.5 Tbsp scoop. Hope this helps!
I am going to make these for sure! My kids will definitely enjoy these! However, my daughter & I have a severe nut allergies that will put us into anaphylactic shock. Is there another substitute I can use, like doubling the vanilla extract? Thanks!!
You can just leave out the almond extract all together. Definitely make them safe for you, they will still be great!
Where are the amounts of the ingredients
The ingredients are listed in full in the actual recipe card at the bottom of the post. Along with specific instructions.
Sounds good But you don’t give how much you need in measurement to make these how much sugar how much of all the ingredients
The ingredients are listed in full with amounts in the actual recipe card at the bottom of the post. Along with specific instructions.