We may earn a commission when you click on the affiliate links in this post.
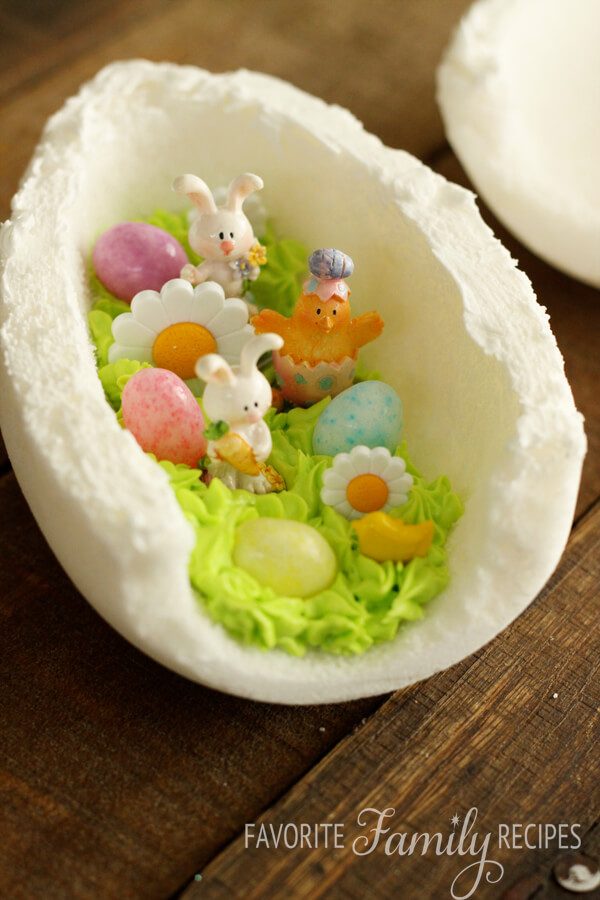
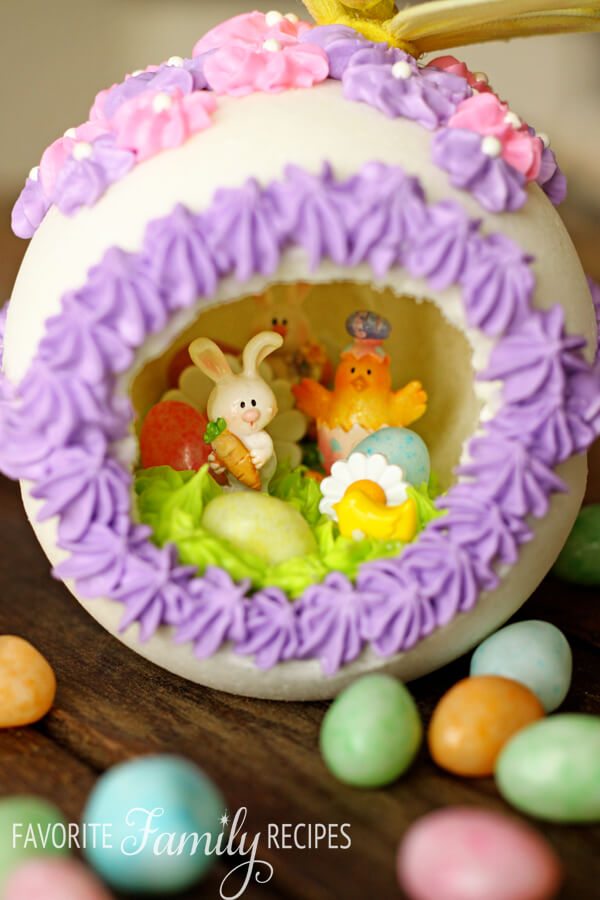
Panoramic Easter Eggs are such a fun Easter craft for kids! Decorate with frosting, flowers, jelly beans, and little bunnies and chicks.

Table of Contents
- A Fun Easter Craft for the Whole Family
- What You’ll Need to Make Panoramic Easter Eggs
- Step-by-Step Guide to Making Panoramic Easter Eggs
- Creative Ideas for Your Panoramic Easter Eggs
- Helpful Tips from Fellow Crafters
- Questions About Panoramic Easter Eggs
- Keep the Tradition Alive
- More Easter Recipes
- Panoramic Easter Eggs Recipe
A Fun Easter Craft for the Whole Family
I’m so excited to share one of my absolute favorite Easter crafts with you – Panoramic Easter Eggs! These beautiful, sugar-crafted eggs aren’t just decorations; they’re little windows into magical Easter scenes that you and your family will cherish for years to come. Whether you’re crafting with kids, friends, or flying solo, this is a fun, creative way to add a special touch to your Easter celebrations.
Why I Love Making Panoramic Easter Eggs
Though these aren’t edible (I know, it’s tempting because they’re made with sugar!), they hold a special place in my heart. This craft is a beloved family tradition, filled with laughter, creativity, and lots of colorful messes. Plus, they make fantastic gifts and keepsakes that can be treasured year after year.
What You’ll Need to Make Panoramic Easter Eggs
The best part? You probably already have most of these ingredients at home. Here’s your Panoramic Easter Egg supply list:
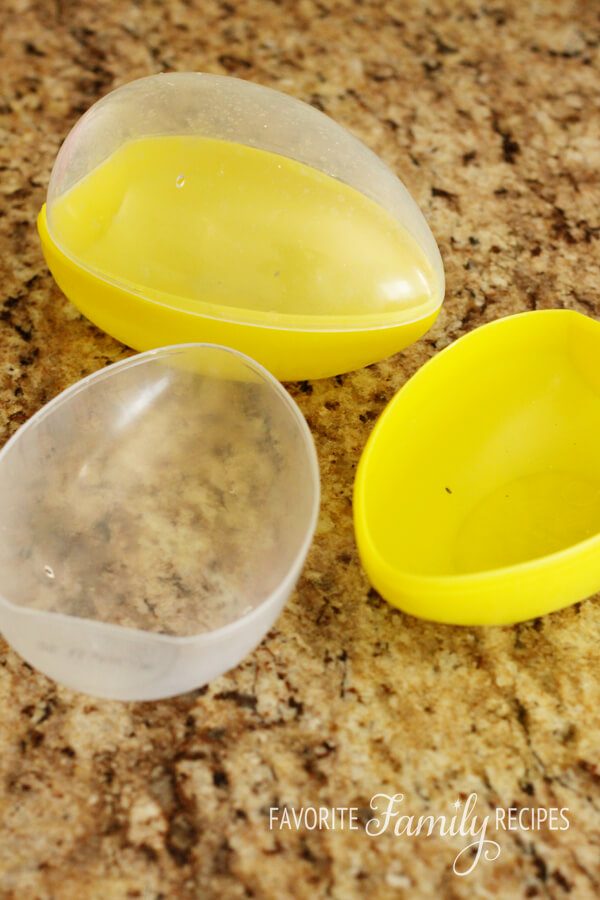
- Egg Mold: You can use a plastic Easter egg or even create your own mold. Look for ones with a flat base so your egg stands easily.
- Egg White: This acts as the glue, bonding everything together.
- Sugars: Both granulated and powdered sugar help create that sturdy egg shape.
- Decorations: Jelly beans, mini Easter candies, tiny figurines, and colorful sprinkles work perfectly.
- Icing: Royal icing to hold things together and add decorative borders.
- Optional: Green-tinted coconut, Easter grass, ribbons, or even small photos for a unique background.

Step-by-Step Guide to Making Panoramic Easter Eggs
Ready to get started? Let’s hop into it!
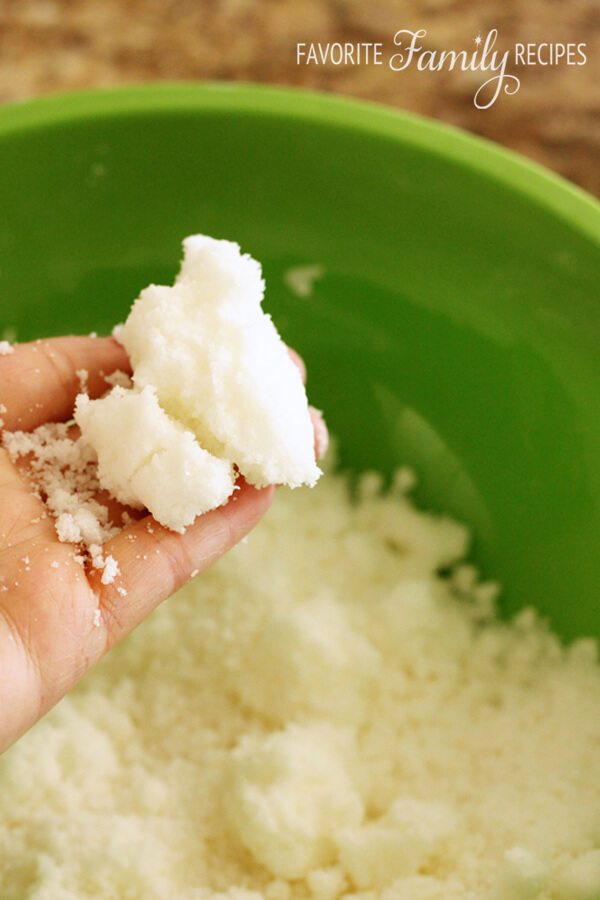
- Prepare the Sugar Mixture – Whisk the egg white until it’s foamy. In a separate bowl, mix the granulated and powdered sugars until well combined. Pour the egg white into the sugars and stir until the mixture feels like wet sand—perfect for molding.
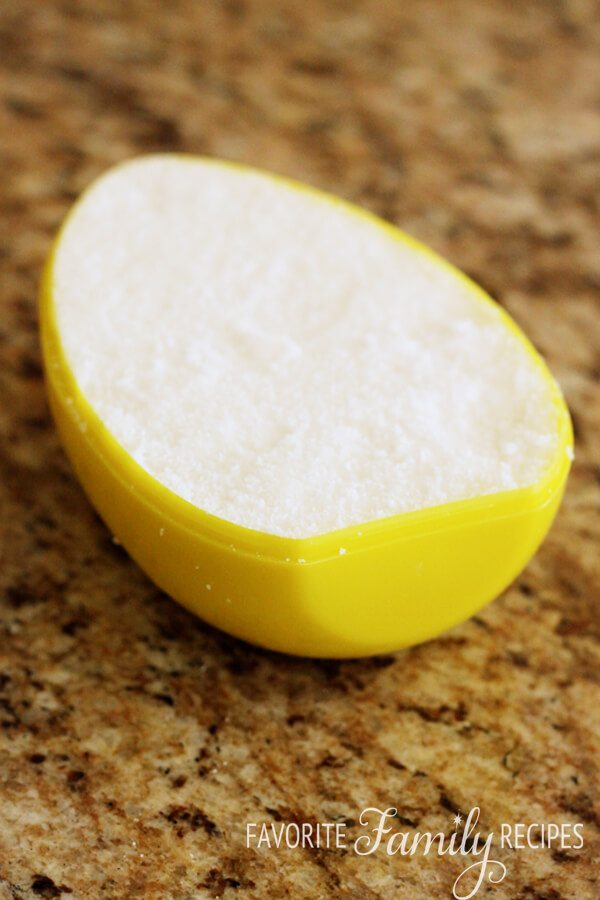
- Fill the Egg Mold – Pack the sugar mixture firmly into each half of your egg mold. Smooth the surface with the back of a spoon to avoid cracks.
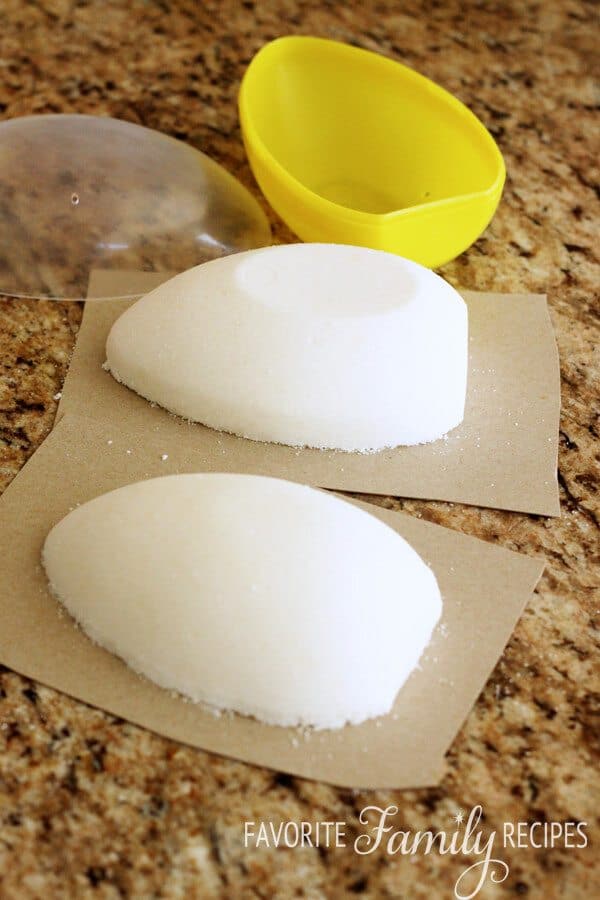
- Create the Egg Halves – Place a stiff piece of cardboard over the mold, flip it quickly, and gently lift the mold off. You should have two perfect sugar egg halves!
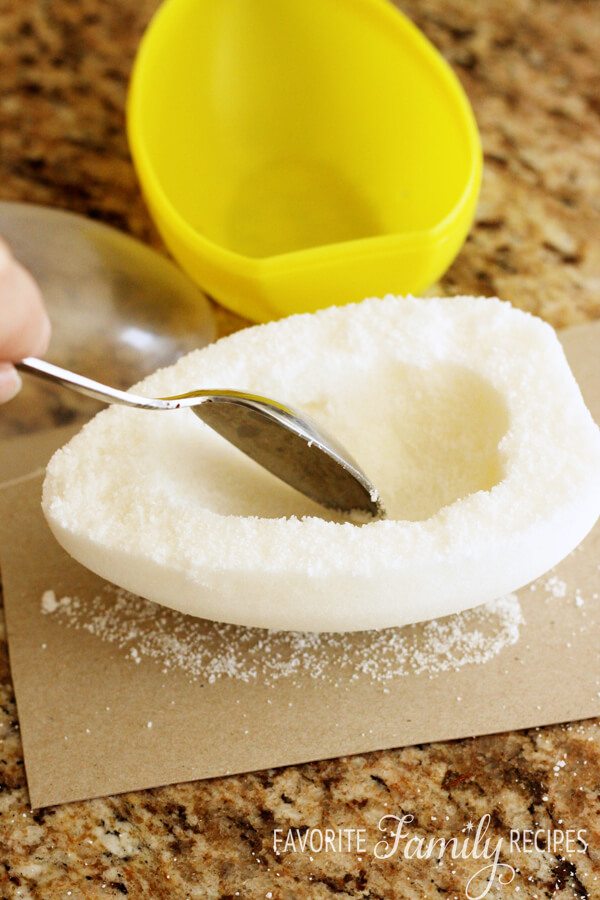
- Hollow Out the Eggs – After the eggs start to set, gently scrape out the moist sugar from the center with a spoon. This creates the hollow space for your panoramic scene.
- Cut the Viewing Window – Carefully trim the tip of each egg half with a serrated knife to create a peek-through window.
- Let Them Dry – Allow the egg halves to dry overnight. This step is key to ensuring they harden properly.
- Decorate the Inside – Now the fun really begins! Use royal icing to secure tiny decorations inside—think mini bunnies, jelly beans, flowers, and Easter grass.
- Assemble the Egg – Use royal icing (or hot glue) to attach the two halves together. Run your finger around the seam to smooth any excess icing.
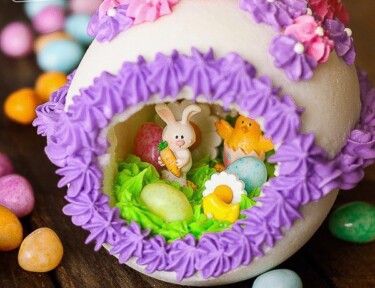
- Add the Final Touches – Pipe decorative frosting around the seam and viewing window. Add extra embellishments like ribbons, frosting flowers, or edible glitter.
Creative Ideas for Your Panoramic Easter Eggs
- Bright Colors: Add a few drops of food coloring to your sugar mixture for vibrant eggs.
- Themed Scenes: Create tiny gardens, Easter bunnies in meadows, or even miniature springtime picnics inside your egg.
- Photo Backgrounds: Use small printed photos as backdrops for an extra personal touch.

Helpful Tips from Fellow Crafters
Here are tips from our readers that have made these Panoramic Easter Eggs:
- Pre Make the Opening – When you unmold the top and bottom sugar shapes to bake, put them on a wooden board with the small ends facing each other. Cut about an inch off of each small end, scrape away that portion, and carefully push the two egg halves together so those blunt ends touch. After they have baked, take them off the board and scrape out the insides. The viewing opening will automatically form. – Virginia
- For Easy Windows – One trick I use is to perforate the viewing end, using a toothpick, so it can be easily, but carefully, cracked off when scraping the egg out. You need to make a ½ circle of perforations on the top and again on the matching bottom. Do this carefully when the sugar egg is first turned out of the mold. – Julia
- Decorations – I used paste food coloring for more vivid pinks, blues, and other colors for the sugar egg. Sometimes using a ribbon that went all the way around the horizontal egg with a bow on top and crafted flowers like roses that dried hard over the ribbon. The background inside could be photos of small clusters of flowers found on postcards. But, have to be small as it is the background. I used a Wilton egg-shaped 2-piece cake pan, to make a giant egg as a centerpiece to use “after” the actual cake was cut up and served, still had a centerpiece for the table. – Shelley
Questions About Panoramic Easter Eggs
They date back to the 19th century in Germany, where children received sugar eggs in their Easter bonnets.
Nope! They’re made with food-safe ingredients but are purely decorative.
Store in a cool, dry place, wrapped in tissue paper or bubble wrap. Keep away from moisture to prevent melting.
If stored properly, these decorative eggs can last for many years! Just be sure to keep them away from humidity and direct sunlight.
Yes, you can get creative with household items. Try using small bowls, cups, or shaping the sugar mixture by hand.
Don’t worry! Use royal icing as “glue” to repair minor cracks. For larger breaks, consider incorporating the crack into your design with decorative piping.
Keep the Tradition Alive
I hope you have as much fun making these as I do every year. They’re more than just decorations—they’re memories in the making. If you try this craft, let me please know how it goes below in the comments and how you decorated yours. Happy Easter crafting!
More Easter Recipes
These are always fun and delicious ways to share a little more Easter traditions with your loved ones! These cakes, cookies, and chocolate is the perfect pairing for any Easter meal or fun for kids to help within the kitchen this spring season.
Panoramic Easter Eggs
Video
Ingredients
- 1 egg white
- food coloring optional
- 3 1/2 cups granulated sugar
- 1/2 cup powdered sugar
- royal frosting
- jelly beans
- tiny Easter figurines and decorations
Instructions
- Whisk the egg white until it becomes kind of foamy. In a separate bowl, mix together the granulated and powdered sugars so they’re mixed well. Pour the egg white into the sugars and begin stirring.*
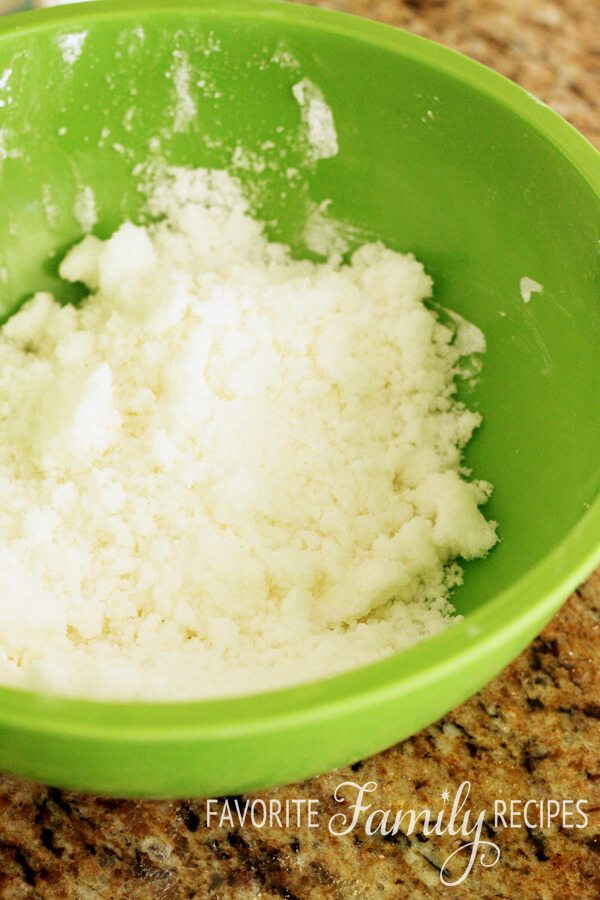
- At first it will seem like it won't get wet enough, but keep stirring until it becomes like damp beach sand.
- Once your sugar mixture is ready, start filling your egg mold. With each scoop, pack down firmly. You want the egg to be smooth, so press down on the sugar to prevent any small gaps or cracks from forming. If you have excess sugar and want to make more eggs, keep it in a bowl and place a damp paper towel directly over the sugar to prevent it from drying out.
- Place a stiff piece of cardboard directly on the top of the mold. Bracing one hand on the cardboard and the other underneath the mold, quickly flip it upside-down so that the egg halves are now resting on the cardboard. Quickly remove the mold—now you should have two perfect sugar egg halves.
- At this point, the egg halves need to dry out a little before you can use them. You can let them sit at room temperature for about 6-7 hours, or you can put them in a 200-degree oven for 15-30 minutes (depending on the humidity and elevation where you live). Once the eggs have started to set, they need to be hollowed out. It is important to do this when the outside is hard, but the insides are still soft. Once the egg has fully set, it cannot be reshaped! Pick up the egg half, hold it in the palm of one hand and use a spoon to scrape out the moist sugar. Continue to scrape the interior of the egg until you have a sugar shell that is about 1/2-inch thick. You want it to be as thin as possible, while still being sturdy enough to hold together.Scrape out the interior of the other egg half. CAREFULLY use a serrated knife to slice off the tip of each egg, this will be the hole you look through to see the panorama so make it about the size you would like. Be careful not to apply too much pressure and cause the egg to collapse or crack. Continue to gently whittle/sand away to front of the egg until the two halves match. At this point the eggs need to dry out further before they can be completed. I would recommend letting them dry out overnight.
- Once the egg halves are dry and very hard, you can decorate the inside with a beautiful Easter scene. Pipe a small amount of royal icing (click HERE for recipe) into the bottom portion of the egg half. This is to anchor everything else you add. Add a layer of green-tinted coconut or Easter grass, if desired, and press gently to adhere it to the frosting. Add little figurines, pictures, buttons, small candies, or sugar decorations. It is easiest to add a dab of royal icing to the back or bottom of your decorations to help them stick. Now it is time to glue the two halves of the egg together. Pipe a thin line of royal icing (or you can use a hot glue gun) around the lip of the bottom half of the egg. Press the top half down onto the bottom, making sure that they line up evenly. Run your finger around the seam where the eggs meet to remove any excess frosting. You want to do this right away so that it will not begin to harden into unsightly shapes. Allow the egg to sit for about 30 minutes, until the frosting has hardened enough to move the egg without damaging it.

- Time to put the finishing touches on your egg! Pipe a decorative border around the seams where the two egg halves were joined together. Also pipe a border around the opening of the window, to better frame the scene inside and to hide any uneven edges. If you have frosting flowers or other decorations for the outside of the egg, now is the time to put them on. Use a small dab of royal frosting to secure them to the egg. Decorate to your desire with any additional frosting.
Notes
- Do not eat. Panoramic Easter eggs are for decoration only.
- If you would like to color your egg, add food coloring to the egg white in Step 1 above and mix well. If you do add coloring to your egg, remember that you will be adding a lot of sugar to the egg white, so it’s a good idea to dye the egg white a darker color than what you want your final product to be.
I made these many years ago myself but for some reason stopped. My mother always made these every year for my sisters and I. Will have to try this again. Thanks for posting them and reminding me of my yonger years.
I learned how to make these 30+ years ago, when I was learning to decorate cakes professionally to get my creative juices an outlet. I used paste food coloring for more vivid pinks, blues etc for the sugar egg. I sometimes used a ribbon that went all the way around the horizontal egg with a bow on top and had crafted flowers like roses that dried hard, then were attached. The background inside could be photos of small clusters of flowers etc found on postcards. Have to be small as it is background. I saw upright plastic eggs med size at Walmart that held candy, but would make perfect molds. I have used a Wilton egg shaped 2 piece cake pan, to make a giant egg as a centerpiece to use “after” the actual cake was cut up and served, still had a centerpiece for the table.
Wow, those are all great ideas! I love the idea of a giant egg! That would be awesome!
Thank you for posting. Would you happen to know the edible recipe? Also looking for a maple sugar candy recipe.
I don’t know how we could make these edible.. sorry!
I read about people keeping these sugar eggs for years. and I gotta ask. Aren’t you worried they’ll draw bugs? I really love these and remember them from when I was a kid but only my older siblings got them, and I don’t think Mom made them. Too late to ask her now as she’s been gone 12 years, but anyway live the way these look but,like with Gingerbread houses at Christmas, I don’t want or need bugs.
I have never had a problem with bugs. I don’t know why– I have stored them and never had any issues.
If you leave them out long enough, they can attract ants. That happened with the sugar skulls my son made for Día de los Muertos at school. But, if you just had them out at Easter and stored them in an airtight container the rest of the year it should be fine.
The oldest one I have is one my mom and I made back in 1973. The sugar is more gray than white (from dust as I kept it in my china cabinet for years without being covered) and the lavender icing is also pretty faded, but other than that it is in perfect condition. If you live where it’s very humid, you probably need to keep it wrapped in saran wrap–otherwise, just store in a dry place and take them out to decorate for the Easter season. I have never had an issue with bugs. I started making them with my mom when I was 12 and now 55 years later, I’m still making them.
Where do you buy the cute figurines for inside? I bought molds to make these last year – because I have fond childhood memories of them – and could not find anything to put in them. Would love some advice!
I mostly just used “miniatrues” found by the miniature dollhouse section of the craft store. That is where I found the bunnies and ducks. I also used buttons and miniature tree Easter ornaments (also from the craft store). Oh and for the easter “eggs” I just used jelly beans 🙂
Thank you!
For the figures inside, Walmart has small suckers that have bunnies, chickens and eggs, they are about inch tall, I cut the sticks as close as I could to the bottom and stuck them into the icing “grass” worked out good . My 14 year old nieces had fun with this project, thanks all who shared they would keep for years, the girls are going to try to keep theirs.
I made these years ago for a lady that gave them to her Sunday School class. I piped all the figures that went on the inside. Wilton had molds for the eggs. Large, medium and small. Through the years of moving my molds got cracked and they broke. I wish Wilton still made them. It’s hard to find candy eggs that open long ways. It’s fun though. When I was a kid, they sold large chocolate covered creme eggs with royal icing and would write your name on them. I thought that was the coolest thing. I was with my mom at Woolworths. Good old days!
Hello, I love this! My Grandma used to make these for us, and I’m going to try to make them for my family in her memory. Would you mind sharing what you used for the decorations in the inside and dots on the flowers on top?
The dots were just little cake decorating “pearls”. The decorations were a mixture of Easter ornaments (for the mini trees), dollhouse miniatures, jelly beans, and buttons. Hope this helps!
How do your sort them? I made my children one 34 years ago. Moved all over the country (Florida, Boston, Missouri) and they kept very well. I kept them in my china cabinet. We moved to Louisiana and I unpacked them and they were fine. I put them on my dining room table and the next morning they were a pile of sugar!! UGH!!! I was devastated!!! I now live in Louisiana and spoke to a Wilton rep and she had now idea what might have happened. So I m wondering how you store them cause I am getting ready to make them for my grandchildren,
Thanks!
I have never have had an issue storing them or transporting them– I have no idea what could have happened! You want to make sure they are in a super dry place with no moisture. I don’t know if this is much help. I will do some research and see if I can figure out what could have caused them to do that.
The average %humidity in South Louisiana in February is in the mid 70s with mid to high 80s occurring regularly in the mornings dropping by the afternoons to the mid 50s. With comfortable temperatures if your air conditioning unit did not run much then your indoor humidity levels may have risen and your eggs simply could not hold together in the extreme humidity.
That’s a bummer. We don’t have a lot of humidity here, I have never thought about that being an issue with these.
Where did you get the cute little figures? I can’t find any that are as cute as yours!
I have been collecting them over the years. I find most of them at craft stores around Easter time. I found a bunch of them in the miniature figurine section at Hobby Lobby. The ones near the doll houses. Hope this helps!
These are so adorable I can’t wait to make them!!! Does anyone know where to buy the little things u put inside the egg? Bunny rabbit, chick ,flower,etc? Thank you!!
I buy Cute Easter cards and cut out the characters and use them in the egg.
thank you so very much for the info. Yours was the only one with complete info in one place. I made these for my kids and their friends 27 years ago and some of them still have theirs. Now I can make them for our 8 (and 1 on the way) grandbabies. I can’t wait to give them their suar eggs
I’m impressed they have lasted 27 years. That is amazing! Thank you for your comment and have fun making them for your grandchildren!
I was given one of these eggs years ago with a pic of my son in it now I’m trying my hand at it and my oven is on the frits so until I get the new part I was wondering if there was any other way to set the eggs rather than waiting 6-7 hours…any suggestions would be apprieciated !!! Thanks in advance. BTW LOVE your site!!!
All the pictures from this post are missing! was wondering if it is my computer or the post itself? I am really hoping to make these for my grandbabies this year…thank you for your help!
I will try to dig them up– some of our pictures have been kind of funny lately.
I love this, My Mom, 30 something years ago, got me one with my sons pic inside & I love it!!! Also I got my molds at the Dollar Store!! I do have a question…the element in my stove just exloded sooo I was wondering if, while waiting for replacement piece, with Easter right around the corner any other ideas on drying faster than waiting 6-7 hours on counter? Like toaster oven or microwave I’m open to anything!!! Thanks again for this ” how to”!!!
Thanks, I made these eggs years ago from a Wilton kit, but can’t get them anymore. I wanted to make them with my Assistant living ladies for Easter but my egg mold had broke and thanks to you I know what I can use instead. Great Idea.
Thanks, again, Denise
Hi i make the ones you can eat…instead of using the egg. you use 4tbs. meringue power,5 lbs. regular sugar, and 6 tbs. warm water. No powdered sugar for the mold….also when i do mine i do not leave the middle of the egg full if you take and press it really good about 1/4 inch thick all around and leave your cutout hole out…i used the same mold you have from walmart. the flat part is where my hole is. then put on cardboard and dry in oven for 10 minutes! And these are Edible.
Hey Chassie, I have been looking everywhere for an edible recipe! Thank you! I have also read elsewhere that you can use “pavlova magic” which is more accessible than meringue powder. Also thank you to the author of the page I can’t wait to try it 😀
Do u have any pics of the ones u have done. Could I share some of u do??
I just have to say I love your blog!!! After seeing this project I ran to the store so I could make them with my kids. They had so much fun. So thanks for all your great posts.
Thanks for the comments everyone! Miller- I am so glad your kids had a fun time with them! Feel free to take pictures and send them my way!
WHY in the world, would ANYONE, make something out of FOOD items, yet it CAN’T be eaten???? I ALWAYS ate my eggs, the Easter Bunny left me!!!!
I remember getting at least one, when I was young, and it seems to me I ate it, but it didn’t taste very good… that may have been over 70 years ago.
Back in the 60s my Mom made tons of these, all 100% edible. Use candy figures, M&Ms, and jellybeans. Use the royal icing to glue everything together. Once dried, keep it in a ziplock.
Those are adorable. I got one of those when I was little as well, although I don't think that my mom made them. I have always wondered how they were made and put together. THANKS for sharing. I love them.
wow these are so cute! what a fun date night for you guys, yours are both so creative!
Thanks for sharing the how-to! When my kids are a little older I'd like to try this.
Thank you for posting this. The family is coming this Sunday for Easter, and I have been racking my brain for a project to keep the kids entertained. This is PERFECT!!!
Where can I buy th little figurines inside of the egg?
We have collected ours over the years at various craft stores. The best ones we have found are at more of the boutique craft stores or ones that sell the vintage figurines. Hope this helps!
I also buy the Easter trees and use the little ornaments inside of mine.
That is a GREAT idea!!!
I made mine out of the frosting took some time but I am retired and time is about all I have L.O.L.
I made these years ago. If you want to have the end open to look inside take your knife and cut both sides in the same place. Then put the ends up to the end you just cut. Let dry overnight. Then next day take them apart and scoop out the soft sugar. Save sugar to make more. Glue together using royal icing. You can use the sugar and press into candy molds to make animals inside. Make flowers etc. I would use an egg box to store them. I would do this ahead. Keeps for years. If you want it to stand up cut off one side in about 1/2” or less. Doing same thing overnight. Wrap in clear wrap.